Water adds magic to landscape photography. The way it moves, reflects, and transforms light creates opportunities unlike any other subject.
But photographing water well requires deliberate choices. The same waterfall can look completely different depending on your shutter speed, whether frozen droplets or silky ribbons. The same ocean can appear chaotic or serene depending on your exposure decisions.
This guide covers the techniques for photographing moving water in all its forms, and it's one of the most specialized topics in our landscape guide. It helps you make intentional creative choices rather than leaving results to chance.
The Core Creative Decision: Freeze or Blur?
Every photograph of moving water involves the same fundamental question: do you want to freeze the motion or blur it?
Frozen Motion
Fast shutter speeds capture individual droplets, splashes, and waves with crisp detail. The water looks dynamic, energetic, and realistic. This is how our eyes actually perceive fast-moving water, frozen in an instant.
Use frozen motion when:
- You want to show the energy and chaos of moving water
- Details of splashing, spray, or wave structure matter
- The scene feels dramatic and powerful
- You want a more documentary or realistic look
Technical requirements:
- Fast shutter speeds (1/250s to 1/1000s or faster)
- Bright conditions or higher ISO
- May work handheld
Blurred Motion
Slow shutter speeds smooth moving water into silky streaks and soft surfaces, turning waterfalls into ribbons, streams into glass, and oceans into mist.
Use blurred motion when:
- You want a sense of calm, flow, or passage of time
- Smoothed water provides contrast against sharp, stationary elements
- The scene feels peaceful or ethereal
- You prefer a more artistic or interpretive look
Technical requirements:
- Slow shutter speeds (1/4s to several seconds or more)
- Lower light conditions or neutral density filters
- Tripod essential
No Single "Right" Answer
Neither approach is inherently better, and the choice depends on the scene, the mood you want to create, and your personal vision. The same waterfall photographed both ways yields valid but very different images.
The skill is recognizing which treatment suits your subject and knowing how to achieve it technically.
Photographing Waterfalls
Waterfalls are perhaps the most popular water photography subject, and they respond dramatically to shutter speed choices.
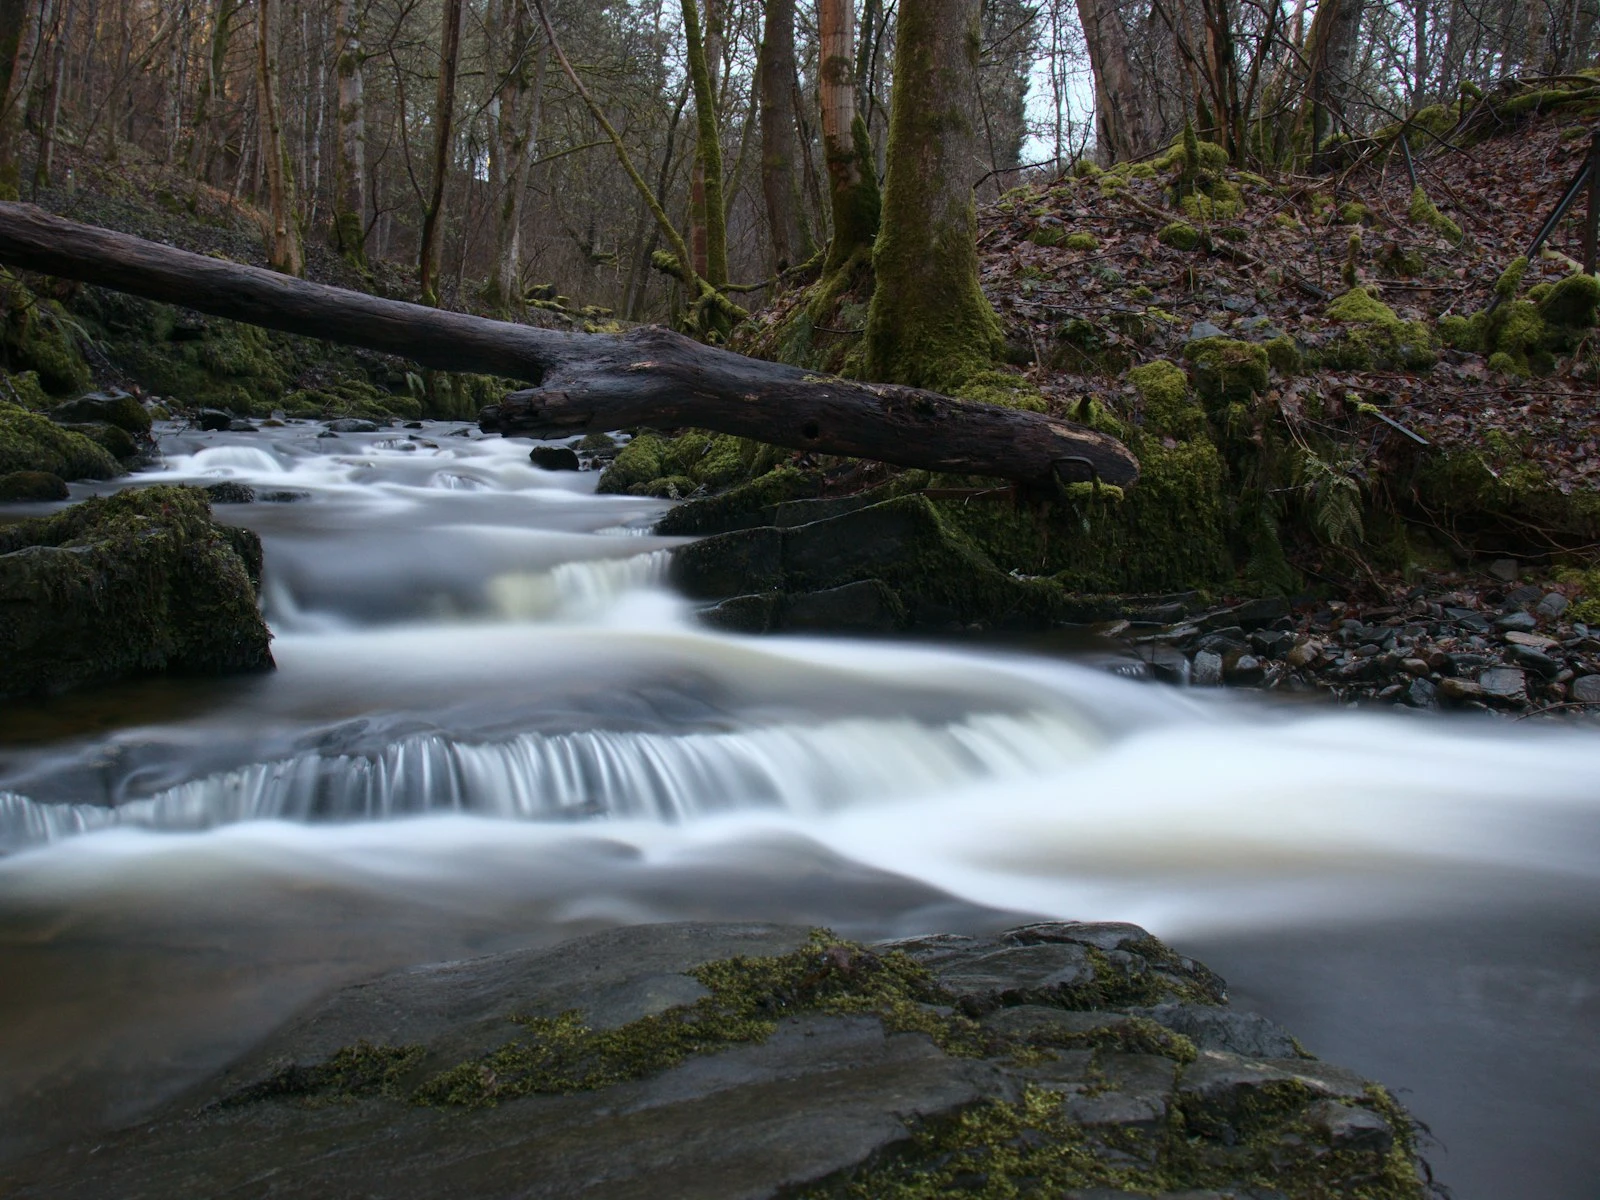
The Silky Waterfall Look
That smooth, flowing appearance requires exposure times long enough for water to move through the frame during capture.
Shutter speed guidelines:
- 1/4 second: Noticeable blur begins
- 1/2 to 1 second: Moderate silky effect
- 2-4 seconds: Strong silky ribbons
- 8+ seconds: Maximum smoothing, risk of losing all texture
The sweet spot: For most waterfalls, 0.5 to 2 seconds provides pleasing blur while retaining some texture and form. Extremely long exposures can make water look like smooth paint, which some find unnatural.
How to achieve it:
- Use a tripod, which is essential for any exposure longer than about 1/30s
- Set aperture to f/11 or f/16 for depth of field
- Keep ISO at base (100 or 200)
- If shutter speed is still too fast, add a neutral density (ND) filter
The Frozen Waterfall Look
Capturing individual droplets requires fast shutter speeds, often faster than conditions naturally allow.
Shutter speed guidelines:
- 1/250s: Moderate freezing, some blur in fastest water
- 1/500s: Strong freezing effect
- 1/1000s+: Complete freeze of all motion
How to achieve it:
- Open your aperture (f/4, f/5.6) to allow more light
- Raise ISO as needed (400-1600)
- Shoot in bright conditions when possible
- Accept that depth of field may be shallower
Composition Considerations for Waterfalls
Include context. A waterfall isolated against blank space lacks sense of place. Include surrounding rocks, vegetation, or streambed to show where the water fits in the landscape.
Find foreground. Rocks, plants, or pools at the base of a fall create foreground interest and depth.
Watch for spray. Waterfall mist can drift onto your lens, creating spots. Bring a microfiber cloth and check your lens between shots.
Overcast preferred. Waterfalls in deep shade or overcast light are easier to expose properly than waterfalls with harsh sun creating bright highlights and dark shadows. That said, golden hour light can add beautiful warmth to water scenes.
Photographing Rivers and Streams
Rivers and streams offer continuous motion without the dramatic drop of waterfalls. The techniques are similar, with some specific considerations.
Creating Flow
For streams, even moderate shutter speeds can create pleasing blur:
- 1/8s to 1/2s often suffices for smooth-looking water
- Very long exposures may eliminate all surface texture, making water look solid
Composition ideas:
- S-curves that lead the eye through the frame
- Including rocks that break the water's surface, creating contrast between static and moving
- Getting low to emphasize foreground rapids
- Finding reflections in still pools adjacent to moving water
The Challenge of Uneven Motion
Rivers often have areas of different speed: fast rapids, slow pools, still eddies. A single shutter speed may blur the rapids while the pools remain unchanged, or freeze the pools while the rapids turn to paint.
Solutions:
- Compose to emphasize areas with consistent speed
- Accept that different areas will look different
- Consider focus stacking or compositing multiple exposures
Technical Tips
Polarizing filters reduce glare and reflections, revealing underwater details like rocks and patterns. They also add slight neutral density, slowing shutter speeds.
Watch for blown highlights on white water. Fast-moving water catches light intensely. Check histogram and protect highlights even if shadows go dark.
Photographing Oceans and Seas
Ocean photography presents unique challenges, from massive scale and continuous unpredictable motion to salt spray threatening your gear.
Wave Motion Options
Frozen waves (1/500s+) capture the drama of crashing surf, spray suspended in air, curling tubes with visible structure. This is dynamic, powerful imagery.
Blurred waves (1-5 seconds) smooth the chaos into mist and flow. Waves become soft washes across sand. The sea looks peaceful despite its motion.
Ultra-long exposures (30+ seconds) turn the ocean into flat, foggy surfaces where waves become invisible and the sea appears glassy and ethereal.
Working with Wave Patterns
Ocean waves follow patterns, though not perfectly predictable ones. Spend time watching before shooting:
- How far do waves reach up the beach?
- How long between wave sets?
- Which waves are largest?
- What happens as waves recede?
Timing your shots:
- For frozen waves, shoot at peak action, the moment of crash
- For long exposures, start exposure as a wave begins its wash, capturing the full motion
- Watch for dramatic moments (backwash meeting incoming wave, spray catching light)
Beach Foreground Elements
Beaches offer natural foreground interest:
- Wet sand reflecting sky colors
- Patterns in sand after wave recession
- Rocks partially submerged in surf
- Seaweed, shells, driftwood
- Tide pools and their reflections
Safety and Gear Protection
Water is unpredictable. Waves arrive without warning, so keep one eye on the ocean at all times and position yourself and your gear safely.
Salt spray damages gear. Even if waves don't reach you, spray carries in wind. Bring rain covers or plastic bags for your camera. Clean gear thoroughly after coastal shooting.
Rogue waves are real. Don't position yourself where a larger-than-expected wave could be dangerous. Rocks and jetties are particularly hazardous.
Tripod stability. Sand and water can destabilize tripods. Push legs firmly into wet sand. Beware of waves undermining tripod placement.
Essential Gear for Water Photography
Tripod
A tripod is non-negotiable for long exposure work, so choose one that:
- Handles moisture without corroding
- Can be positioned at water level (removable center column or flexible leg angles)
- Provides stability on uneven surfaces
Neutral Density Filters
ND filters reduce light reaching your sensor, allowing slower shutter speeds in bright conditions.
ND filter strengths:
- 3-stop (ND8): Light reduction for moderately slow exposures
- 6-stop (ND64): Significant reduction for multi-second exposures
- 10-stop (ND1000): Extreme reduction for very long exposures in daylight
Recommendation: A 6-stop ND filter covers most waterfall and stream situations. Add a 10-stop if you want daytime long exposures at the ocean.
Not sure which filter strength you need? The ND filter math shows you the resulting shutter speed for any filter and base exposure combination.
Polarizing Filter
Reduces reflections from water surfaces and wet rocks. Can reveal underwater details and deepen sky colors. Adds 1-2 stops of light reduction as a bonus.
Lens Hood and Cloth
Spray and mist find their way to your front element. A hood helps, but carrying a microfiber cloth for frequent cleaning is essential.
Weather Protection
Rain covers, plastic bags, or weather-sealed bodies help when spray is unavoidable. Don't let moisture concerns prevent you from getting good shots, but do come prepared.
Technical Settings Summary
For Silky Water (Waterfalls, Streams)
- Mode: Aperture Priority or Manual
- Aperture: f/11 to f/16
- ISO: 100 (base)
- Shutter: 0.5s to 2s (adjust by adding ND filtration)
- Focus: Manual or single-shot AF
- Tripod: Required
For Frozen Water (Waves, Splashes)
- Mode: Shutter Priority or Manual
- Shutter: 1/500s to 1/1000s
- Aperture: As needed for exposure (often f/4-f/8)
- ISO: Raise as needed (400-1600)
- Focus: Continuous AF for tracking waves
- Tripod: Optional
For Ultra-Long Ocean Exposures
- Mode: Manual
- Aperture: f/8 to f/11
- ISO: 100
- Shutter: 30s to several minutes (Bulb mode for very long)
- ND Filter: 10-stop
- Tripod: Essential, weighted if possible
- Focus: Manual (AF may fail in low light)
Common Mistakes and Solutions
Mistake: Over-Smoothing Water
Problem: Exposure so long that water loses all texture and looks artificial.
Solution: Shorten exposure. Even silky water should retain some form and structure. Test different durations and review results.
Mistake: Mixed Motion Looks Messy
Problem: Some water blurred, some frozen, static elements showing movement.
Solution: Commit to one approach. Either freeze everything or blur enough that the intent is clear. Intermediate exposures often look accidental.
Mistake: Blown Highlights on White Water
Problem: Rapids and waterfalls clip to pure white with no detail.
Solution: Expose for highlights, letting shadows go dark (recover in post). Use histogram to verify highlights aren't clipping.
Mistake: Unstable Tripod
Problem: Tripod moves during long exposure, softening the entire image.
Solution: Push legs firmly into ground. Add weight (hang your bag from center column hook). Wait for wind gusts to pass. Use remote release to avoid touching camera. The tripod guide covers stability techniques in detail.
Mistake: Forgetting to Clean Lens
Problem: Spray spots appear on final images.
Solution: Check and clean front element between every few shots in misty conditions.
Key Takeaways
- Decide whether to freeze or blur water before choosing settings, since each tells a completely different story about the same scene.
- Use 1/250s or faster to freeze water droplets and splashes, and 1/4s to several seconds for the silky smooth look (tripod required).
- Use a neutral density (ND) filter to achieve slow shutter speeds for smooth water during bright daylight conditions.
- Include stationary elements (rocks, trees, structures) alongside blurred water to create contrast between stillness and motion.
More in This Guide
Continue exploring landscape photography.