Your flash and your living room disagree about what white looks like.
A flash fires daylight colored light, around 5500K. The bulbs lighting most homes are warm, around 2700 to 3000K. Put both in one frame and you can only correct for one of them. Correct for the flash and the background goes deep orange. Correct for the room and your subject turns blue. The fix is a thin piece of orange plastic that costs less than a coffee. Tape it over the flash head and both light sources match. Now one white balance setting fixes the entire frame.
Gels sit at the edge of flash technique, but they solve a problem you'll hit the first time you fire a flash indoors at night. This article, one of the more specialized corners of the full flash guide, covers why mixed lighting happens, how correction gels work, and what to do when you'd rather mismatch on purpose.
Why Mixed Lighting Breaks Your Color
Every light source has a color temperature, measured in kelvin. Lower numbers are warmer and more orange, higher numbers cooler and more blue. A candle sits around 1900K. Household tungsten bulbs sit around 2700 to 3000K. Daylight and flash both sit around 5500K.
Your eyes hide this from you. Walk from a sunny street into a lamp-lit room and within seconds everything looks normal again, because your brain rebalances color constantly. Your camera doesn't get that luxury. It has to commit to one interpretation of white per frame, and that commitment is the white balance setting.
One light source is easy. If the whole room is tungsten, you set white balance to tungsten and every color falls into place. That's the same problem covered in why indoor photos look yellow or orange, and with a single source it's a quick fix.
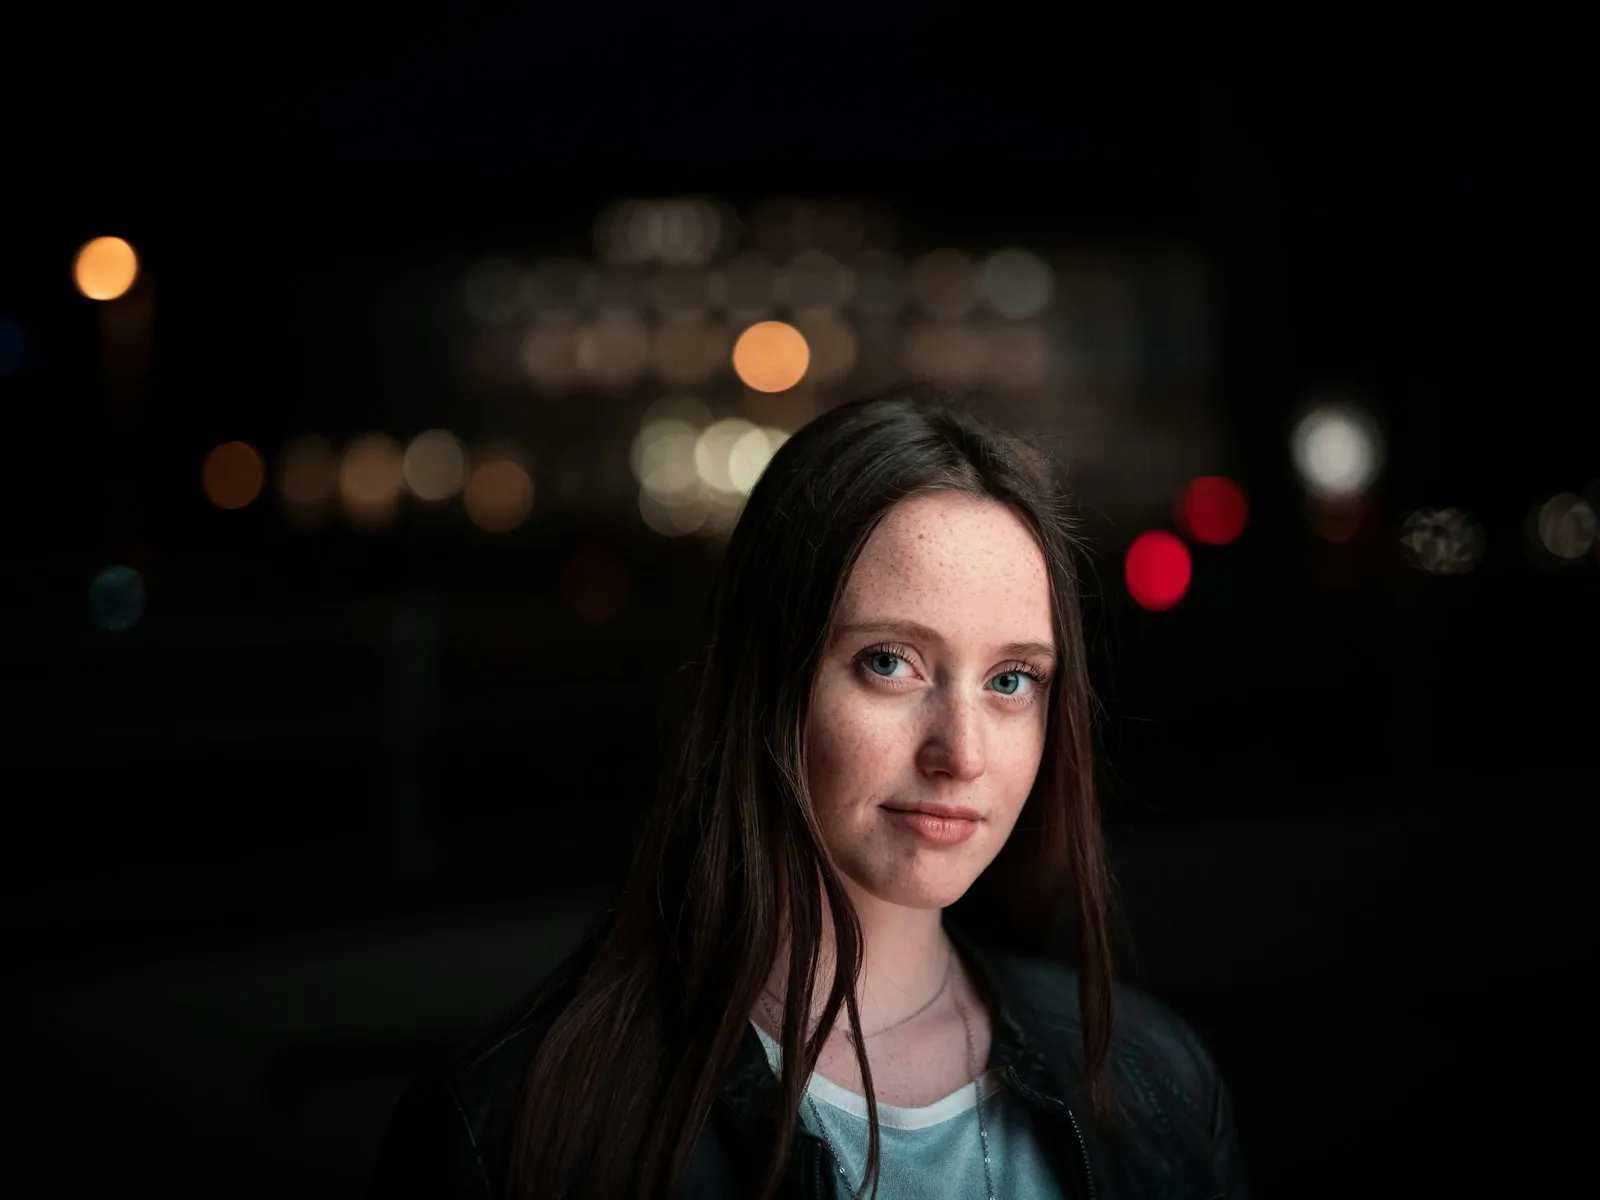
Flash adds a second source at a wildly different temperature. Now the frame contains 5500K light on your subject and 3000K light on everything the flash didn't reach. Whatever white balance you choose, half the frame is wrong. Blue subject on a warm background, or natural subject on a pumpkin-orange background. Pick your poison.
Why Editing Can't Fix a Mixed Frame
The white balance slider in Lightroom is global. Drag it warmer and the entire image gets warmer, including the parts that were already too warm. Correcting white balance in editing works beautifully when one light source dominates. It falls apart when two sources at different temperatures share the frame.
You can try local adjustments. Mask the subject, cool the background, feather the edges. It's slow and rarely survives close inspection. Hair is the giveaway. The fine strands at the edge of your subject are lit by both sources at once and refuse to mask cleanly, so they end up haloed in the wrong color.
Shooting RAW doesn't escape this either. RAW gives you complete freedom to choose any single white balance after the fact. It doesn't let you choose two. The mismatch is baked into the light itself, so the only complete fix happens before you press the shutter.
The principle worth memorizing: match your light sources in camera, and white balance becomes one global decision instead of an impossible compromise.
What a Gel Actually Is
A gel is a thin sheet of heat-resistant colored polyester placed over a light source to change its color. The name comes from theatre, where these filters were once actual gelatin. Modern ones are tough plastic film, sold in big sheets and small precut swatches.
For a speedlight, a gel the size of a credit card covers the whole flash head. Tape works. A rubber band works. Velcro and magnetic holders work if you want to feel organized. No precision required; the only job is making sure every bit of light leaving the flash passes through the filter.
Two gels do almost all of the correction work:
- CTO (Color Temperature Orange). Warms the flash down toward tungsten. A full CTO takes a 5500K flash to roughly 2900 to 3200K, close enough to match household bulbs.
- CTB (Color Temperature Blue). The reverse, cooling a warm source up toward daylight. As a flash photographer you'll rarely reach for it, because your flash is already daylight balanced.
One cost to know about. Gels absorb light. A full CTO eats roughly two thirds of a stop, so a gelled flash needs a little more power, a wider aperture, or a higher ISO to deliver the same exposure.
The Correction Workflow
Here's the complete process for a tungsten-lit room, start to finish:
-
Identify the ambient. Look at the bulbs lighting the room. Warm household bulbs mean tungsten territory, around 2700 to 3000K.
-
Gel the flash to match. Full CTO over the flash head. Your flash now produces warm light at roughly the same temperature as the room.
-
Set one white balance. Switch the camera to its tungsten preset (the light bulb icon) or set roughly 3000K manually. The flash-lit subject and the ambient-lit background now both render neutral.
-
Balance the power. Decide how much of the frame is flash and how much is ambient. That's an exposure decision, not a color one, and it's covered fully in how to balance flash with ambient light.
-
Shoot and check. Look at the background in your test frame. If it still leans orange or blue relative to your subject, your gel strength or white balance needs a nudge.
Notice what changed. Before the gel, color was an unsolvable problem with two correct answers. After the gel, color is one setting, and your only remaining decision is brightness.
Half Cuts and Quarter Cuts
Correction gels come in fractional strengths, and the fractions are where the craft lives.
Full CTO. Complete conversion, 5500K down to roughly 2900 to 3200K. Use it when you want the flash to disappear into the tungsten ambient entirely.
Half CTO. Takes the flash to roughly 3800K. The flash stays noticeably cooler than the room, but the gap shrinks from a canyon to a step.
Quarter CTO. A gentle warming to roughly 4500K. Barely visible on its own, useful for taking the clinical edge off bare flash anywhere.
Why would you ever want a partial match? Because a perfect match can look flat. With a half CTO on the flash and white balance set between the two temperatures, your subject renders close to neutral while the background keeps a warm, cozy glow. The room still feels like evening. That deliberate leftover warmth often looks more honest than a fully neutralized frame, because warm background light is how people remember interiors at night.
My take, after plenty of evenings in living rooms and reception venues. Half CTO is the right default indoors. Full CTO is technically correct, but a frame with every trace of warmth removed can feel like an office. Keep a little of the orange and the photo remembers what the room felt like.
Fluorescent and LED Lights Are Messier
Tungsten is the easy case because it sits at a predictable temperature. Other sources misbehave in less convenient ways.
Fluorescent tubes have a green spike. They aren't simply warm or cool, they push green in a way no warm-to-cool adjustment can fix. The matching gel is called plus green, and it adds the same green bias to your flash. Gel the flash with plus green, set white balance to the fluorescent preset, and the camera removes the green from everything at once with a magenta shift. Skip the gel and your subject picks up a magenta cast while the background stays green.
LEDs are anyone's guess. Modern LED bulbs span warm 2700K to cold 6500K, and cheap ones render some colors poorly no matter what white balance you choose. The number on the box is a rough claim, not a promise. The reliable approach is a test frame. Photograph something white or gray under the ambient alone, find the white balance that neutralizes it, then gel your flash toward that temperature.
Mixed ambient is the hardest case. A room with window daylight on one side and tungsten lamps on the other already contains a mismatch before your flash fires, and you can't gel to match both. Pick the source that dominates your background, match that, and accept the other as character. The same triage applies when photographing city lights at night, where every window and streetlamp is its own temperature and perfect correction doesn't exist.
Creative Gels in Brief
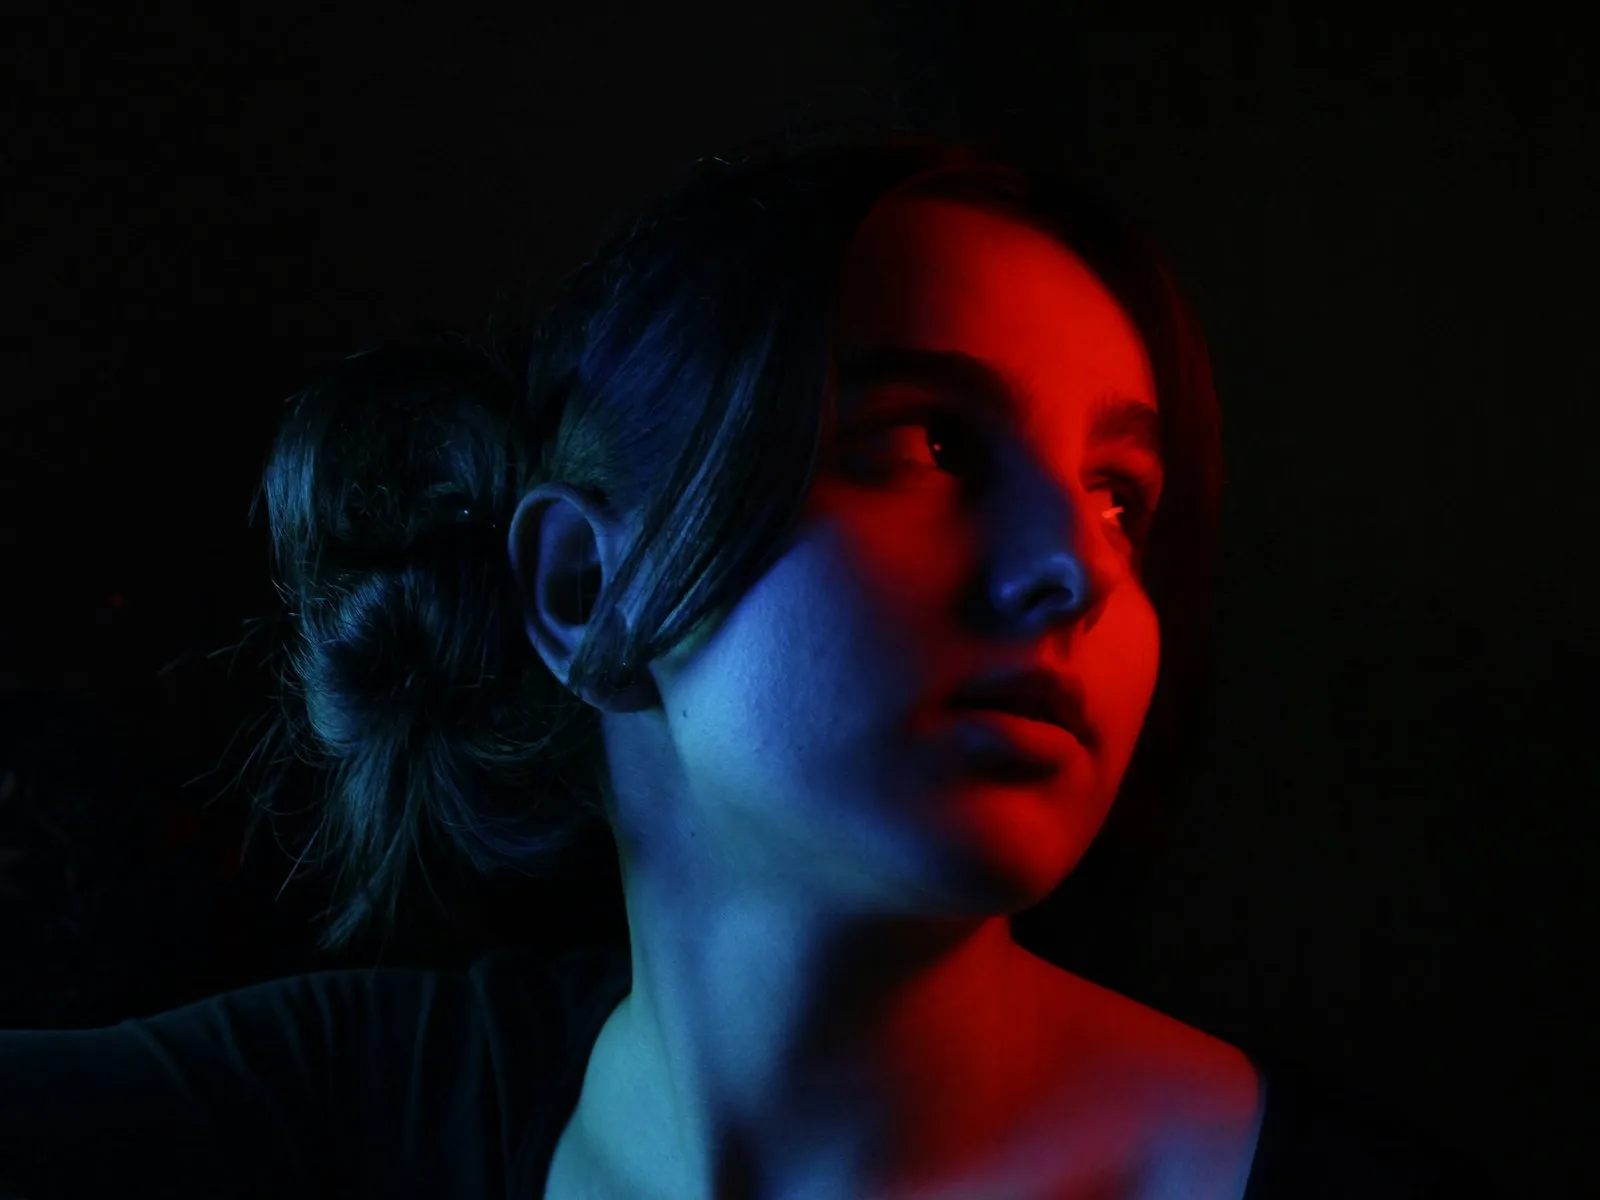
Correction means matching light. Creative gelling is the opposite, a deliberate mismatch for effect.
Colored backgrounds from a plain wall. Put a saturated gel (red, blue, magenta) on an off-camera flash aimed at a wall, light your subject with a clean or CTO-gelled flash, and the wall becomes any color you like. One white wall turns into an endless set of backdrops for the price of a few plastic squares.
Mood through temperature. A warm gel on a flash behind your subject reads as low sun. A blue-gelled background pushes a portrait toward night even at noon. Viewers read color temperature as time and place, and gels let you write that part of the story yourself.
The rule that keeps creative gels usable. Keep the light on your subject's face clean or correction-gelled so skin stays believable, and play with color everywhere else. A face that goes fully red or blue is a specific look. Fine on purpose, hard to rescue by accident.
What to Buy
This is the cheapest corner of photography, which is partly why it's so underused.
A sample swatch book costs almost nothing. Gel manufacturers sell sample books containing dozens of small squares for a few dollars, and each square is almost exactly the size of a speedlight head. One sample book covers full and partial correction plus a whole palette of creative colors. It's the best value-per-dollar purchase in flash photography.
Precut speedlight kits are the convenient option. These come sized for flash heads with a band or holder, usually including full, half, and quarter CTO, plus green, and a handful of creative colors. Slightly more money for a lot less fiddling.
Magnetic modifier systems are the deluxe option. Quick to swap and hard to lose, but optically identical to a swatch held on with a rubber band.
Whatever you buy, the priority order is clear. Full CTO, half CTO, quarter CTO, plus green. Those four solve mixed lighting in nearly every room you'll ever shoot in. Everything after that is play.
Common Gel Problems and Fixes
Problem: You gelled the flash and bounced it, but the color is still off. Solution: Bounce flash makes the bounce surface part of your light source, so a cream ceiling adds its own warmth on top of your gel. Bounce off neutral white surfaces when color matters, and let the test frame have the final word.
Problem: Gelled shots come out underexposed. Solution: Gels cost light, roughly two thirds of a stop for a full CTO. TTL flash usually compensates automatically. In manual, add power, open the aperture, or raise ISO.
Problem: The gel is warping or smells like hot plastic. Solution: Flash heads get hot during rapid shooting. Leave a small air gap instead of pressing the gel flat against the head, and let the flash rest between bursts. Proper lighting gels tolerate heat, but nothing tolerates a hundred full-power pops in a row.
Problem: You walked outside and every photo went wrong. Solution: The gel is still on the flash and your white balance is still set for tungsten. Daylight needs neither. Pull the gel, reset white balance, and make that check part of changing locations.
Problem: The background color shifts from frame to frame. Solution: Auto white balance re-decides on every shot, which moves the target you just matched. Lock in a fixed white balance whenever you gel.
Key Takeaways
- Gel your flash to match the ambient light, then set one white balance and the whole frame renders correctly.
- Use a full CTO for complete tungsten matching, or a half cut to keep a pleasant warm glow in the background.
- Expect each gel to cost some light; a full CTO absorbs roughly two thirds of a stop of flash power.
- Buy a cheap sample swatch book first, since the small squares fit speedlight heads almost perfectly.
More in This Guide
Continue building your flash skills.